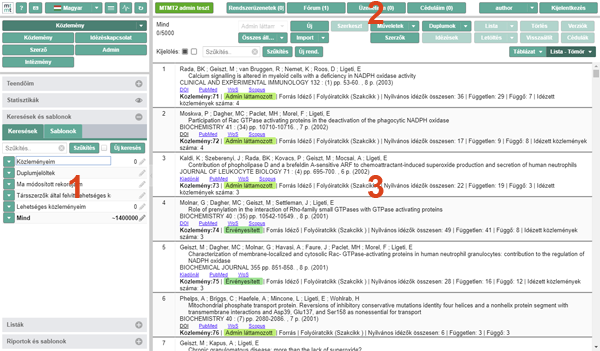

GUI can be separated into three main parts, which are numbered from 1 to 3 in the above image:
In the following subsections, the main functions available in the abovementioned menus are listed.
The Side menu contains constant blocks (buttons on top of the page, data type selector, Statistics
block), and also blocks that can be opened/closed (My to-dos, Searches and templates, Lists,
Reports and templates). To open the latter, click the  icon, to close them click on
the
  icon.
icon.
The following functions are available in the Side menu:
 The Help icon,
describing how to use the system, is in the top block of the Side menu. When clicking this icon, a popup window
opens where information about the structure of the interface (GUI?), and description of the operations available to
users and administrators can be found. When clicking the arrow icon in the right-hand upper corner of this popup
window, Help opens in a new browser window.
 The Report error icon is at the top of the Side
menu. When clicking this icon, a new email opens to be edited in the email reader set by the user. The email address
to which errors are reported is already preset, such as the general descriptors of the system (version number, time
of error reporting, username of the user using the system, type of their browser, etc.). Please send us the email
detailing the errors, faults you have experienced when using the system.
 To change the language of the user interface, click
the Select language button in the top block of the Side menu, then select the required language from the roll down
menu. The language selected can also be seen on the button label. After changing the language setting, the whole
interface reloads itself in the selected language.
 Administrators can send messages to the users
regarding the system. The unread messages will be displayed upon login. To view already read messages, click the View
news button in the top block of the Side menu.
Administrators can edit the content displayed in the News window by clicking Add news, or Edit startpage buttons at the bottom of the window.
 Generating certain lists and
statistics can be very time-consuming. In such cases the background jobs, run on the server, ensure that the
generation is done. To have information on these background jobs, click the View and stop background jobs
button in the top block of the Side menu. When clicking, a popup window comes up and shows the list of the
background jobs: you can view their status, start and finish times, or - if you have the authority - you can also
stop them.
 To refresh all tables in the left panel, click the Refresh button.
As some tasks can be time-consuming, clicking this button helps check the actual status of them in a fast and simple
way.
When clicking this button, the following tables refresh: To-dos,
Searches, search Templates, Lists, Reports, and with an author login (szerzői belépés?)
the Locking lists (Centrally managed list) table.
 In this panel the required data types can be selected.
You can select the most frequently used data types by the light colored buttons.
Other data types can be selected from the (darker colored) roll down menu by clicking on the button. The selected data type will also be seen on the button label.
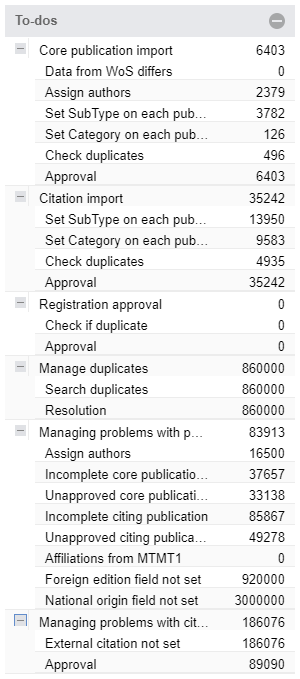 To-dos panel contains the to-do list of needed user actions regarding the records.
Such actions are, for example, to fill publications' missing data upon import, search duplums, or the approval of
records.
The relevant to-dos are arranged in groups. Click the plus button to make further elements (of the list/group?) available. Clicking To-dos displays in the contents field the records belonging to the selected task, and the right side of each task line shows the number of records connected to that very task.
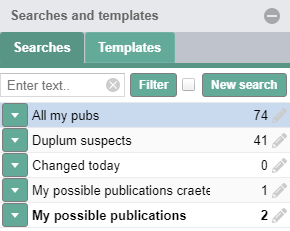 Searches help you sort the
records stored in the server by setting several conditions.
Use the Searches and
templates panel to create searches, manage search templates, and to reach and manage the previously created
searches.
In this panel you find so-called pre-set searches that include frequently requested search conditions. These cannot be modified, but the search conditions can be seen. A similar search can be made by copying such a "pre-set" search.
Clicking the Templates tab the system lists the created search templates.When you click the New template button, an editor window pops up where new templates can be made and saved. The role of the Templates in the system is, that when several new searches are made, the frequently used search conditions should not be added one by one on each occasion. When creating a new search, by selecting the appropriate (pre-made) template the system automatically fills in the saved fields.
To create a new search, click the New search button. Go to Advanced search options for more information about search in details.
Further actions regarding searches are available with the buttons on the left side of searches (itt jó lenne tudni, hogy Search vagy searches, vagy a gombon van-e felirat és arra hivatkozik): A keresésekhez kapcsolódó további műveletek a keresések bal oldalán lévő [▼] gomb segítségével érhetők el, melyek a következők:
You can use Filter to quickly find the requested item in the saved searches list. Write the text you would like to find in the text entry box, then click Filter or Enter to narrow your search.
Between the Filter and New search buttons you find the My saved queries checkbox. Ticking this box, only those queries in the search list will be displayed that have been created by the logged-in user.
The status of the searches in the list are marked by various icons. These icons are on the right side of each line:
Use this panel to reach and manage lists. Lists help collect and arrange the selected records.
Lists can be created in two ways:
Further actions regarding lists are available with the button [▼] on the left side of lists: (see my comment as in Searches)
You can use Filter to quickly find the requested item in the saved lists.
The status of the lists in the list are marked by various icons:
Use this panel to create new reports, or to view / display? reports completed. Reports help create and print summaries of records according to the conditions set by the user. The panel contains two, clickable tabs. Click the Reports tab to download/rerun completed reports, or click the Templates tab to see a list of report templates available to logged-in users in a searchable form.
To create a new Report click the [+] button.
The new report is displayed in the upper row among the reports.
Further actions regarding reports are available with the buttons on the left side of reports (see my comment as in Searches): A riportokhoz kapcsolódó további műveletek a riportok bal oldalán lévő [▼] gomb segítségével érhetők el.
You can use Filter to filter the saved reports.
The status of the reports in the list are marked by various icons:
Click the Templates tab to see a list of report templates available to logged-in users in a searchable form. Similarly to reports, the user can narrow the list with the help of the text entry field, then clicking the Filter button. When clicking on the templates listed, the user is directed to the same editor form as if they initiated the new report in the Reports tab, but this time the template the user clicked on is already selected.
The upper menu contains content independent, permanent items. You find here functions as manage messages, forum, and also the user settings:
Clicking the button on the left side in the upper menu, the actual version number of the software and the time of the latest update is shown. MTMT is being developed and run on several servers. The label and the colour of the button indicates whether you are on the test server or the server running the live operation. It helps when troubleshooting, as the window that pops up when clicking the button helps define in which software version you can find a potential error.
Clicking on the buttons "System messages", "Forum", "My messages" or "My tickets" in the upper menu you can open the relevant tab of the "Messages" window. In the Messages window the following categories are available:
Nex to the button labels the number of unread messages can be seen in brackets. For more information on Messages function, go to Messages, notifications, forum.
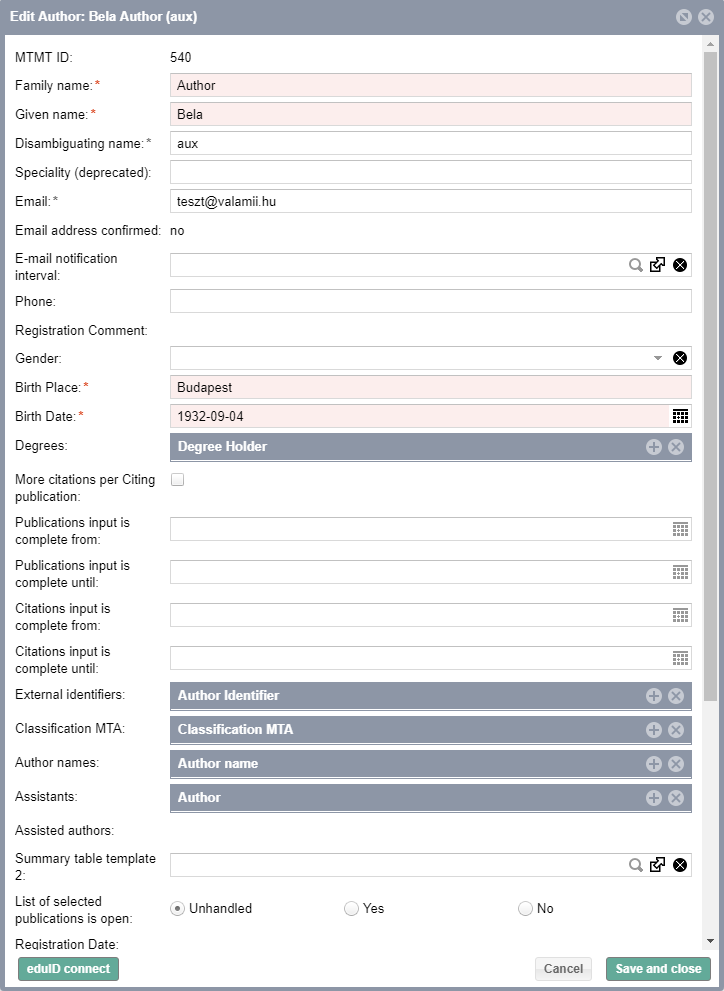
On the right side of the upper menu you find the Logout button. Using the button on its left, which has the logged in user's username as title, the logged in user's user data can be reached and modified. Click this button to reach the following functions:
Click Logout and you are directed to the login-screen of MTMT.
In content view the records generated by various lists and searches are listed. Content view has its own menu bar, that helps manage the records on view. The following functions (and some more) are available here: create a record, delete a record, view/edit a record.
The visibility of each button in the menu bar depends on the data type and the authority level. E.g.: Citations button is only to be seen by Publications. Some buttons can be used depending on selection. E.g.: to use the buttons Remove and Edit, at least one record has to be selected. You can select a record by clicking on the record line, more records can also be selected the same way while pressing and holding the "CTRL" key.
For faster operations, the elements of the Content menu bar are also available in the local menu, that you can reach by clicking on the record with the right-side mouse button.
In the following subsections you find the detailed description of the menu items.
In the upper left-hand corner of the Content panel you can see the name of the currently displayed search or list, and the number of items in it, in the following format: "number of selected items"/"all items of list".
Above the records displayed in the content section, on the left side you can select, or deselect all the listed records with the help of the Select all/Deselect all buttons, which are next to the Select label.
Above the records displayed in the content section, you can search among the records given as a result of a list/search with the help of the text entry field, that is on the left side. The Narrowing option searches among the most important textual data of the records and their MTMT identifiers, narrowing the records displayed to the records that contain the text entered. The text part you wish to find should be written in the text entry field, then by clicking the Filter button, followed by the Enter key, the narrowing is carried out.
Functions to arrange the records are among the content controllers.
To add sorting, click the New sorting button, then you can select the sorting key/component from the
drop-down menu on the right side of the Select sorter button. You can use maximum three sorting keys at a
time, which are applied to the non-visible columns as well. In case a sorting is already applied, the new sortings
will be performed according to it.
A new sorting can also be added in Table view, by clicking the name of the column you wish to sort.
In case of at least one sorting, the Delete sortings button becomes visible, which is to delete all sortings. To delete only a certain sorting, the (X) button next to that sorting is to be used.
The buttons on the right side of the menu bar help you choose between the various content views:
To define a new view click the drop-down menu of the Table button, then select the New... option. In the window coming up, as the initial state, the fields displayed in the table between the selected columns are listed. (itt a magyar mondat sem tiszta nekem) A megjelenő ablakban kezdeti állapotként a választott oszlopok között a táblázatban aktuálisan megjelenített mezők vannak felsorolva. In the window coming up, select the names of the required columns, and click the → button. Name your individual view , then click the "Save and apply" button. When saving a view, not only the given columns are saved, but their order and width, too. You can change the order by drag and drop. If you would like to override the width recommended by the system, it is practical to define all settings (columns, column width, order of columns) in the Table view, so then in this popup window you need to give only the name of the view configuration.
It is also possible to overwrite a previously saved view. Create the appropriate view by deleting and displaying columns, then from the drop-down menu of the Table button select the Overwrite... option. In the Overwrite... window coming up, select the appropriate one from the drop-down menu of theView type configuration field, then with the Save button overwrite the selected view.
Any display format of Grid and List view can be settled as default.
Default views are set depending on the data type. If you do not overwrite it, the Basic view of the List
view is downloaded as default (if it is not available, the All columns view is to appear).
At the top of the content part, you can perform operations not only in general, and only related to display, but operations regarding certain records as well. Basically the operations related to the buttons are performed on the selected records in the content panel. Some operations are applicable to more selected records, too, and some operations make sense without selection.
The details of the operations are in the "Operations on the records" subsection. They are as follows:
Records are displayed here. More than one record can be selected simultaneously, and selections remain the same even after changing to another view. You can select records in the following ways:
Records can be edited in two ways:
the cell content can be selected and copied with Ctrl+C.
For a shortcut, the elements of the Content menu bar are also available in the local menu by clicking on the right side mouse button on the records.
In Content view the status of each record is marked with different colors:
Unapproved
Record coming from Import
Approved record
Admin approved record
Validated record
Checked record
Duplicate record
In Table view, next to the colors, in the Status column the initials of each status is displayed as well, divided by space. If you move the mouse over the abbreviation, the full description of the status is displayed in a floating window.
In many places of the MTMT interface, icons help quick navigation. These are the following, grouped by their place of appearance:
Content area:
 - Closed
 - Gold - Declared as Open
Access (open) journal
 - Green - Open publication
uploaded in the repository by the author
 - Pay
- Pay - Embargo restricted
 - Restricted
Record editing form:
 - Open record attached
 - Open link
 - Order to be modified by Drag and drop
For quicker navigation and data input, the buttons, forms and fields can be handled by using the keyboard:
Some functions are available by key shortcuts:
According to context it is easy to check, if a button has a key combination or not. If it has, the shortkey combination (Alt + Shift + [character]) is displayed in brackets when you move the mouse over the button.
In this menu item the possible operations on records are described in details. These are basically available through the buttons of the content part. To make their identification easier, we named the subsections below with their labels.
With the help of the New button in the content part of the interface you can create a new record that suits the selected record type.
If a record is selected in the Content panel, and the user has permission to edit it, the button reads Edit, but in case the user has no permission to edit, the button reads View. In View mode the detailed content of the given record is displayed in a popup window. In Edit mode, in case you edit only 1 record, the editing form of the given record is displayed, but in case you select more records to be edited, the form used for editing more records simultaneously is displayed.
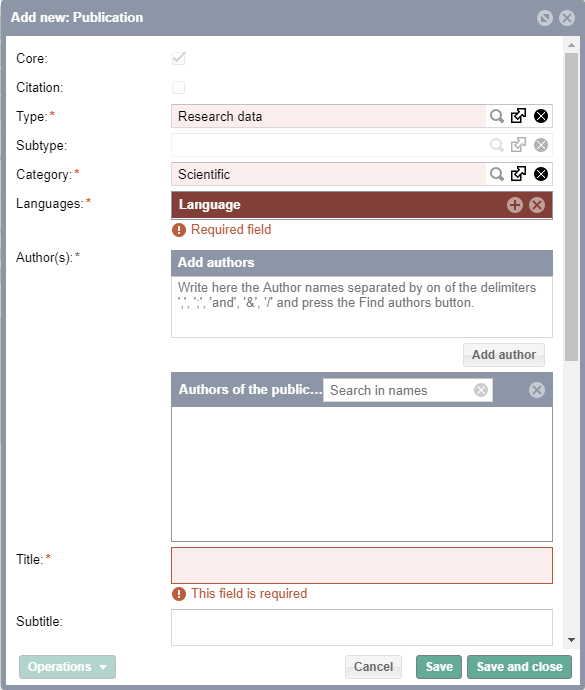
When you edit Content, make sure that you put proper data relevant to each field.
Some fields are obligatory to fill in, these are marked in red. Fields that miss data or are not filled in properly are marked in red: moving the mouse cursor over them an explanation comes up that helps correct the error. The fields, according to their types, can take text, full numbers, list items, a date or part of a date (year, year-month, year-month-day).
There are fields where further records (eg. authors or journals) can be attached. These fields can be recognised
from the + or the
 button. For more information, please read the Records attached section.
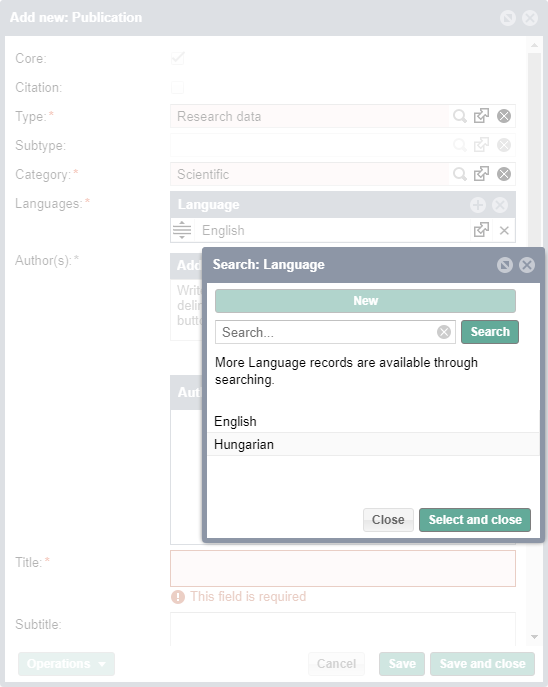
Besides the simple data-input options there are fields, where you can attach further records (eg. authors, or
languages).
These fields can be recognised from the + button or the
( ), or the
  icon.
icon.
 button
To several field-types more records could be attached.
Items can be deleted from the list of the attached items, with the help of the (X) button next to the given record.
The whole content of the list can be deleted by clicking the (X) button in the menubar of the field.
You can also arrange the order of the attached records using the mouse on the items marked with the  icon.
icon.
Clicking the Remove button, the selected record/s can be deleted. You can also delete more than one record when more items are selected at a time.
In general, the buttons and operations in the Content panel are applicable to all record types. Certain operations, however, only apply to the given record type (eg. messages might be sent only to users and administrators). The Operations button hides a roll-down menu, where only those operations are listed, which are unique and applicable to the selected record type.
When selecting one or more citations, then clicking the Check citations button, a window appears where the
selected citations can be marked Independent, and the notice related to the citation can be marked National
origin, Foreign edition.
In the window you can choose between Manual and Automatic modes.
In Manual mode you can set the initially selected fields manually (Independent, National origin, Foreign
edition). If you do not wish to modify the given citation, click the Skip button, and you can go to the next
citations without saving. After you have set all required markings, click the Save and go to next button and
you can do the same on all the following citations.
If you would like to go back to a citation, click the Previous button. Now the marking window of the
previous citation from the selected items is uploaded.
In Automatic mode only the Independent marking is set, which is done based on the automatic offer of the system.
You do not need to do any action here.
After completing the operations, a Summary screen appears where you can see how many citation markings you have
modified.
In case of Publication and Citation data type, similarly to theEdit action, you can add Publication
identifiers .
If you are not authorized to edit the selected record, using the Add publication identifier button you
can add a new identifier even in this case.
Selecting an institute and clicking the Manage institute menu item you can perform several actions on the
selected institute. When clicking the button a popup window comes up, where you can see only the main data of the
selected institute. For further action you have to select from the Operation selector.
Here the following options are available: Create child, Create sibling, Name change, Move data due to
termination, Merge, Split.
After selecting the operation you have to fill in the required fields, which are different for each operation.
Then, clicking the Start button, you can start the selected operation.
Selecting an institute and clicking the Terminate institute menu item you can terminate an institute. When clicking the button a popup window comes up, where you have to give the Data of termination, then clicking the Save button the termination process of the selected institute is started. In case you cannot perform this action due to some error, a popup window informs you about it.
The database of the system uses cache to provide faster operation for the website. If you wish to delete this cache,
and generate a version stored in a new cache based on the actual, most recent version, click the Refresh selected
items button.
Following the editing operations the system automatically refreshes the cache as well, so it is not needed to be
done manually. Please only use this function if you encounter an error or stuck field values. In case you still find
that error after refreshing has been done, contact an administrator.
Clicking the Run cron job button you can run the selected scheduled task.
Clicking the Send message button you can send a message to the selected authors or administrators. The Address field is automatically filled in with the selected users in the popup window that comes up following your clicking the button. When you have filled in the required fields, a message can be sent to the specified recipients by clicking the Send button.
The selected author or administrator can send an email confirming the email address.
Depending on your authority, you can modify the password for a selected author or administrator.
Depending on your authority, you can generate a link to modify the password for a selected author or administrator, and send them the link via email.
Clicking the Enable/Disable access button, you can enable or disable a user to access the system. In case a user's access is disabled, they see an error message when trying to enter the system.
Selecting an institute, you can manage the authors related to it. In the window all authors of the selected
institute are listed, and you can choose from three operations from the above toolbar.
You can add new authors. Click the Add authors button, then select one or more authors available, whom
you wish to add to the given institute. Then fill in the Start of affiliation field and click the Save and
close button. The system will automatically add the selected authors to that institute.
Clicking the Copy affiliations here button, you can copy or move one or more affiliations of another
institute to that institute, for which you called the Manage authors window.
After filling in the required fields click the Save and close button. Following it, the system automatically
adds the selected affiliations to the institute.
Selecting one or more affiliations, you can terminate them by clicking the End affiliation button. To do
so, in the popup window you have to fill the required date in the End of affiliation field, then click the
Save button.
Selecting an institute, you can manage the administrators related to it. In the window all administrators of the
selected institute are listed, and you can choose from three operations from the above toolbar.
You can add new administrators. Click the Add admins button, then select one or more administrators
available,
whom you wish to add to the given institute. Then fill in the Start of admin role field and click the Save
and close button. The system will automatically add the selected administrators to that institute.
Clicking the Copy admins here button, you can copy or move one or more administrators of another
institute to that institute, for which you called the Manage admins window. After filling in the required
fields click the Save and close button. Following it, the system automatically adds the selected
administrators to the institute.
Selecting one or more administrators, you can terminate them by clicking the End admin role button. To do
so, in the popup window you have to fill the required date in the End of admin role field, then click the Save
button.
Selecting one or more citations, you can mark them automatically as self-citation by clicking the Set self citation button. In case you select more citations, the system will ask for your approval to perform this action. In case you select one citation, the system performs this action right away. When set self citation is performed successfully, a notification window appears on screen.
You can create a copy of the selected record(s) with the help of the Duplicate option. When performing this action, the system automatically creates a copy of the selected record(s), copying each field value, that has been filled in, as well.
Clicking the Add to selected publications button, you can add the selected publication(s) to the Selected
publications list, under Lists on the side menu.
For an administrator, the Selected publications list is not available, but first
the author has to be selected in the popup window, so the publication(s) is added to the selected publications of
that selected author.
With the help of the Remove from selected publications option, you can remove the previously added
elements from the selected publications list.
Depending on your authority, you can lock (centrally manage) and unlock the selected record(s). When you lock (centrally manage) a record, it is only to be viewed by any other users and administrators. With this action you can temporarily prevent anyone from making modifications to the record you are managing at the moment.
The system automatically swaps the family name and last name given on all authorship regarding the selected publication(s). In case you select more publications, the system will ask for your approval to perform this action.
With the help of the Versions button you can track modifications made on the records and restore previous versions.
Version management depends on the authority level. Authors can use the version management function only regarding their own records.
For an institute administrator, this function operates on all records related to their institution, , while for a central administrator, it operates on any record in the system.
The tasks regarding each record are available as Tickets to the administrators. You can list these tickets here. More information on the tickets and how they are created is in the Tickets subsection.
The Citations button appears only in case of Publications. With the help of the Citations option you can view the records citing a given publication or add new citations.
View citations
Select the required record, then click the Citations button in the Content menu bar. You can open the elements appearing in the list with double-click.
Add citation
To add a new citation, select the required record, then click the Citations button in the Content menu bar.
Several list operations are available here:
You can import records here. You can select the following sources from the drop-down menu:
To import data from external files, click the Import, then the Import from file (PubMed XLS, Ris, ...) buttons in the Content menu bar, and give the following data:
The action of import can be launched by clicking the Start button. You have to give a list name, under which the imported items will be available. Records added can be viewed in the list that appears in the Lists tag on the Side menu.
The Download button serves for export record/records. By clicking the button, the user can choose the format from the drop-down menu in which they wish to download the selected records.
It serves to automatically manage authors that appear in publications. The following options can be chosen from the drop-down menu:
You can experience different functioning with selected or non-selected publication(s) when clicking the Attach
authorships/institutes
button.
As an author you can select any manageable user.
The system searches for the author names related to the selected author in the publications. It is possible to
search the author names In every available publications (in the full database) or In selected
publication(s) .
In case of Add action, the system searches for authorship where no author is assigned, but the family and
first names correspond with either author names of the selected author.
In case of Remove action, the system searches for authorship where the selected author is assigned to
either authorship.
In the window, it is possible to modify the author names related to the selected author, to do so click the Manage
author names button in the bottom of the window.
At each step, in the checkboxes you can tick the authors, and in case of Delete action the institutions as
well, to which you wish to assign the first selected author or delete such assignment.
Selecting one or more publications and clicking the Find authors button you can assign author, institute, or
authorship type to the authorship regarding each publication.
In case an author, institute or authorship type is already assigned to the authorship, you can modify their
values in this window.
When you have completed all modifications, click the Save and go to next button. The system will save the
modifications and load the interface to modify the authorship regarding the next selected publication.
If you do not wish to make any modification to the current publication, click the Skip
button. The system, without modifying the current publication, will load the interface to modify the authorship
regarding the next selected publication.
After you have finished modifications to all selected publications, a window appears summarizing and showing the
number of the modified items.
Actions related to duplum search are available here:
In case the list in the content part contains an item in italics, it shows that there is at least one duplum of that very item. You can view and manage duplums: you have to select a record, then in the Content menu bar choose the Duplicates menu Duplicate search/show option, and in the new window all duplum items of the given publication appear.
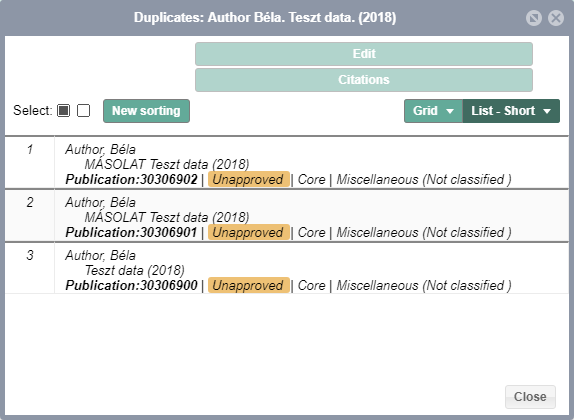
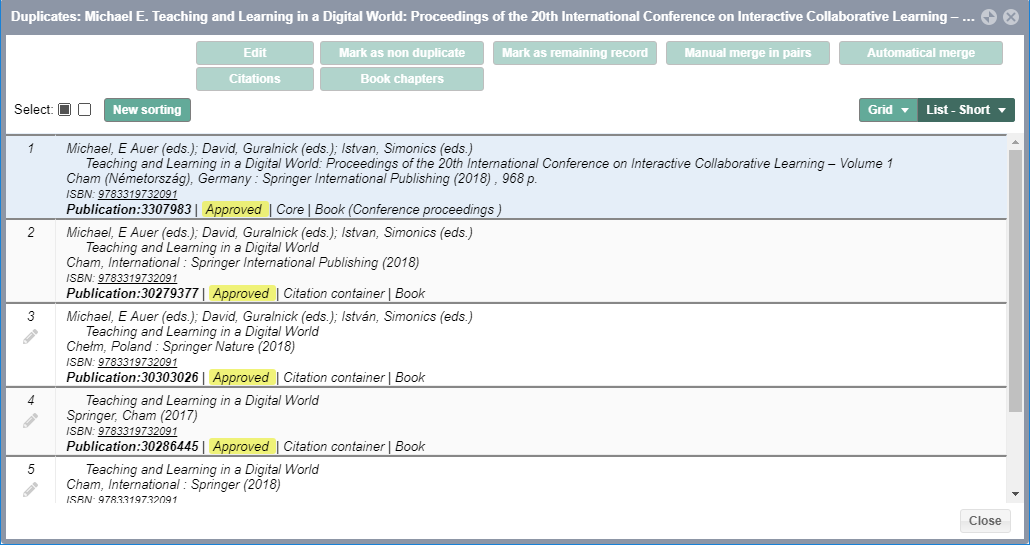
There are two ways to set an item as duplum:
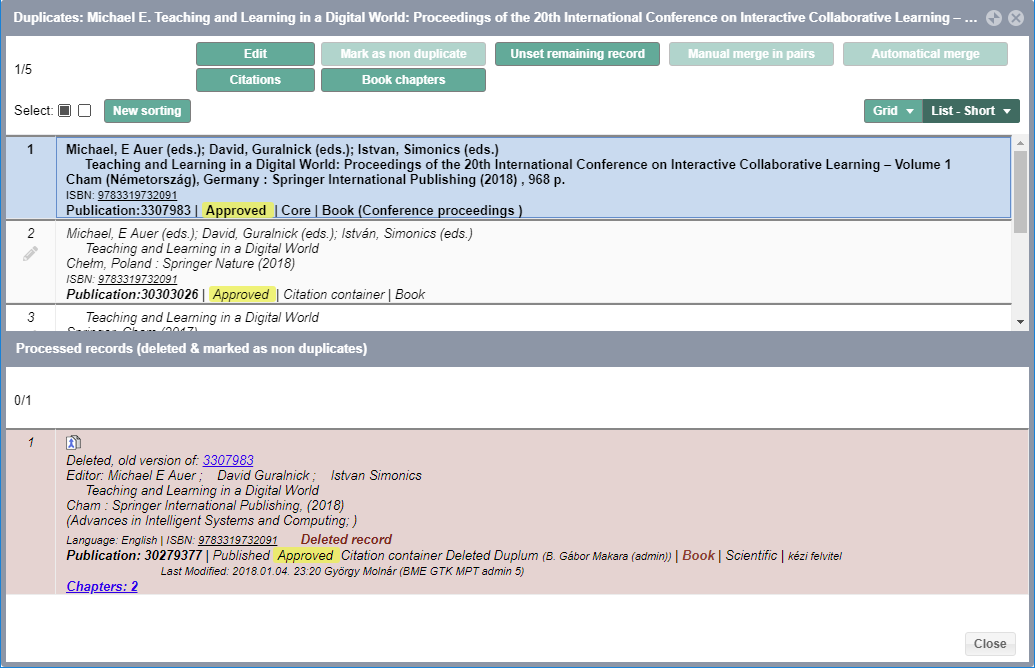
In the database, unwanted duplums can be resolved by the Duplum search function. You can reach this function after selecting the required record, by clicking in the Content menu bar the Duplicates button, then the >Duplicate search/show menu item. A window comes up where you can view the selected record and its duplums. With the help of the above menu bar the following actions can be performed:
 . You can also edit the data of the
Remaining record any time in this window.
In Duplum view each record type is marked with different icons and text style:
TODO: icons
Duplum record
Remaining record
To be Deleted record
In the system you can set up a search that lists deleted records. With the appropriate authority, this button allows you to restore deleted records, that is, you can withdraw the Delete action.
If you wish to restore deleted records, set up a new search that contains the Deleted=True condition as well, then perform this search. Using a filter term find the record to be restored, select it, then in the Content menu bar click the Undelete button. When several records are selected at a time, you can restore all these records simultaneously. The system sends a feedback on the completed action.
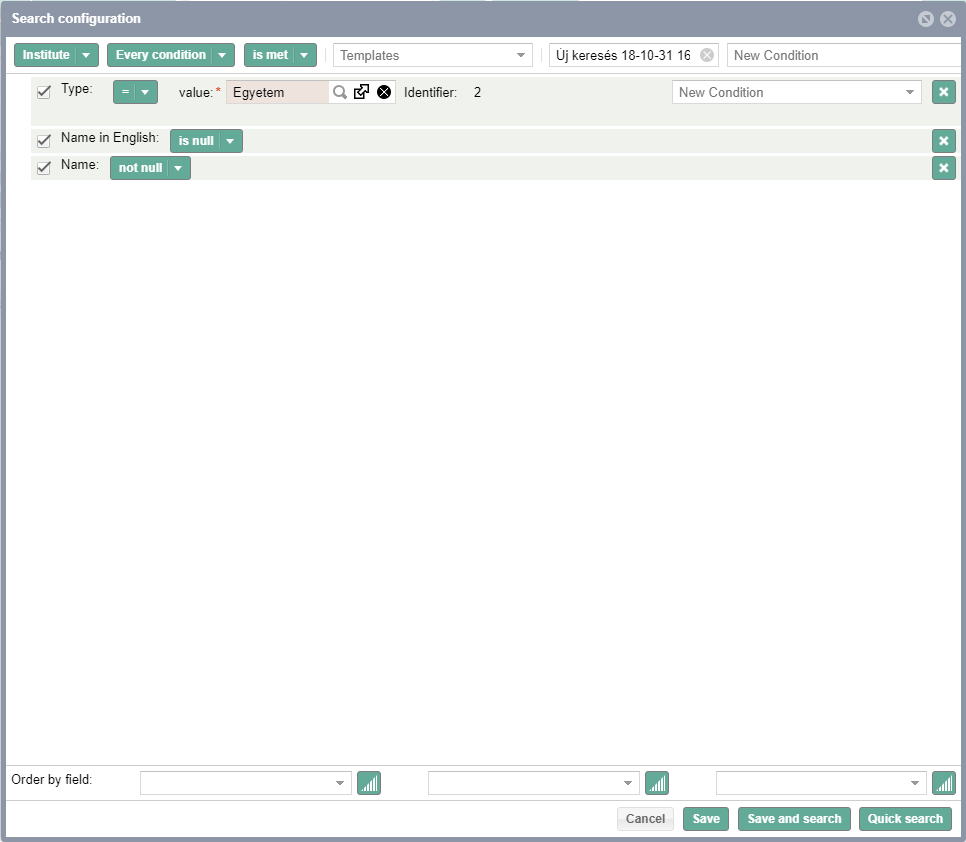
To set up a new search, select the required data type in the left panel, then in the Search panel click the [+] button on the right side. The Search configuration window opens.
Conditions are located one under the other and have their own control elements. To delete a certain line use the [X] button.
By ticking the checkbox to the left of each condition you can select that element to be active, or leaving the checkbox empty you can decide not to use it. Depending on the data type of the search condition, different operators are available. In case of fields containing whole numbers you can search for greater, less, equal or precisely identical records. In case of text-type conditions the character set in a field can be a prefix, suffix or a precise match (for lower- and uppercase letters as well).
With the help of the Sort menu at the bottom of the window the search results can be sorted according to several conditions.
Suppose that as an author, you would like to see your journal publications in one place. You have to do the following:
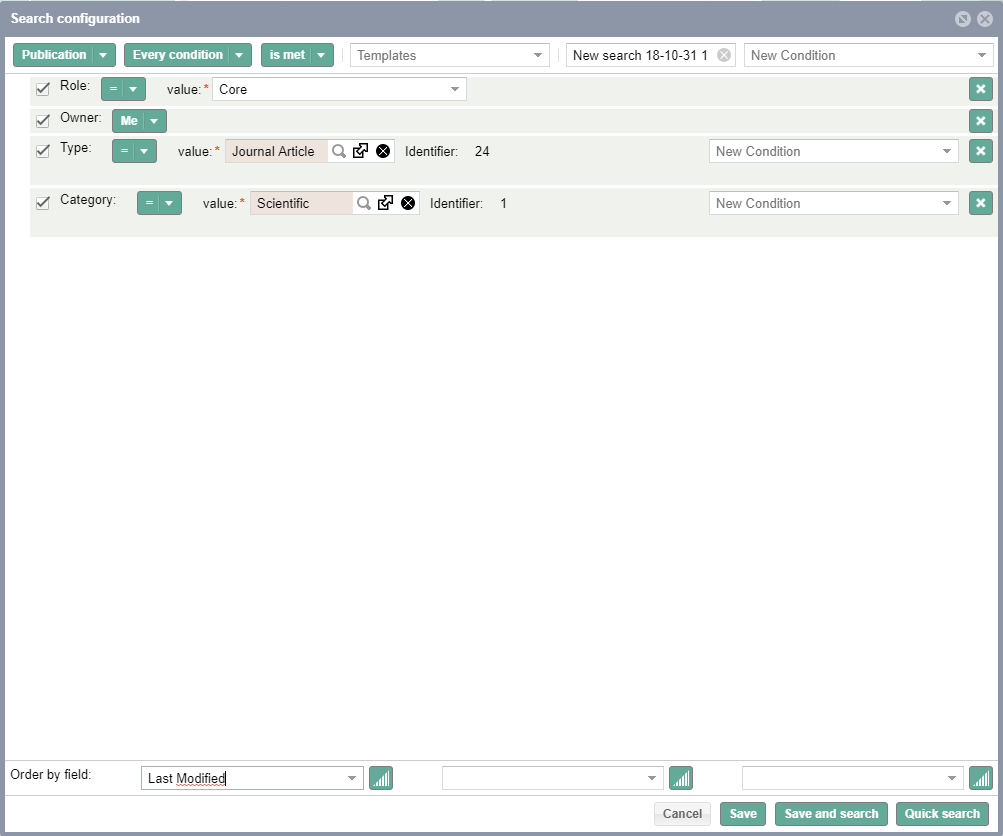
As all your publications are listed under the All my pubs search, it is advised to copy this search and work
with it. To do so, you have to press the triangle on the left side of the All my pubs line, and from the drop-down
menu select the
Copy function.
Then select Type from the search conditions, and set the operator to =. Clicking the  icon, select
Journal Article from the list that appears.
Following it, select Category from the conditions, then with the = operator clicking the  icon, double-click the
Scientific line in the list that appears.
Click the Save and search button and the search appears in the side menu.
If you select the completed search, its results will be loaded into the Content area.
Clicking the arrow on the left side of search, further actions that can be performed on search are available (Edit,
Search,
Remove, etc.).
Search editing is later available by clicking the  at the
end of the line.
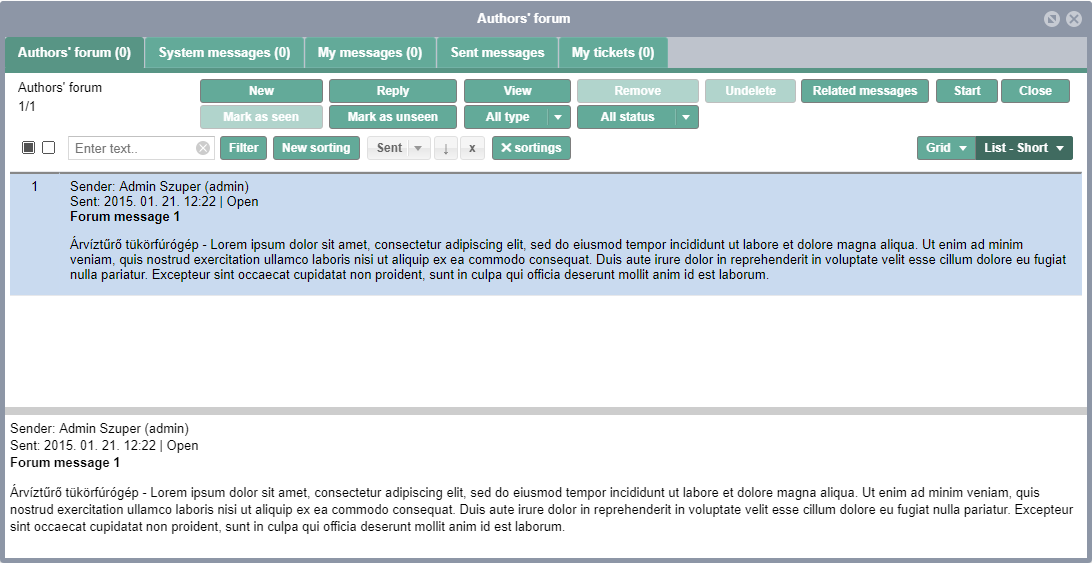
In the Communication window you can manage your messages, browse among your forum blogs and manage your tickets.
The setup of the window is similar to the "Content view". With the help of the tabs at the top of the window you can change between certain message and forum categories. The number of unread messages/notifications can be seen next to the name of the tabs in brackets.
The following tabs are available:
The Institute forum is a special view of the Authors' forum. In this view only the entries related to the actual selected institute of the logged-in user can be seen. If you are a member of more than one institutions, then the institute selector button allows you to change between the institutions.
In the menu bar under the tabs you find the buttons related to each category, with which you can manage the
messages/entries of a certain category.
When clicking once on the messages, their content will be loaded in the lower part of the window.
You can also attach files to the messages and entries.
You can reply to the selected message if you click the Reply button in the menu bar.
You can edit a previously written message only by adding new text to it. This way the content of the original
message always remains the same, and the new text added appears behind the original message together with the date
of the modification.
After selecting a message and clicking the Related messages button the system lists all messages related
to the selected message. You can return to the messages by clicking the All messages button.
Each forum message has a status (Open, Processing, Closed). After being sent, every message
is automatically created with Open status. Administrators can change the status of the messages, indicating
to each other and the sender of the message that they have started the given task. To do so, click the Start
button. Clicking the Close button the message status changes to closed.
Lines in bold print indicates unread messages in the system. After opening a message by clicking on it once, its
status automatically changes from unread to read. In the upper menu bar you can mark the selected message(s) as
unread by clicking the Mark as
unseen button.
On certain tabs you find drop-down menus to select the type and status, and so only items with a certain message/forum type (eg.: Message, Notification) or status (pl.: Open, Closed) will be displayed. When you make a selection, the label of the button automatically changes to the selected element, giving a quick overview even without opening the menus.
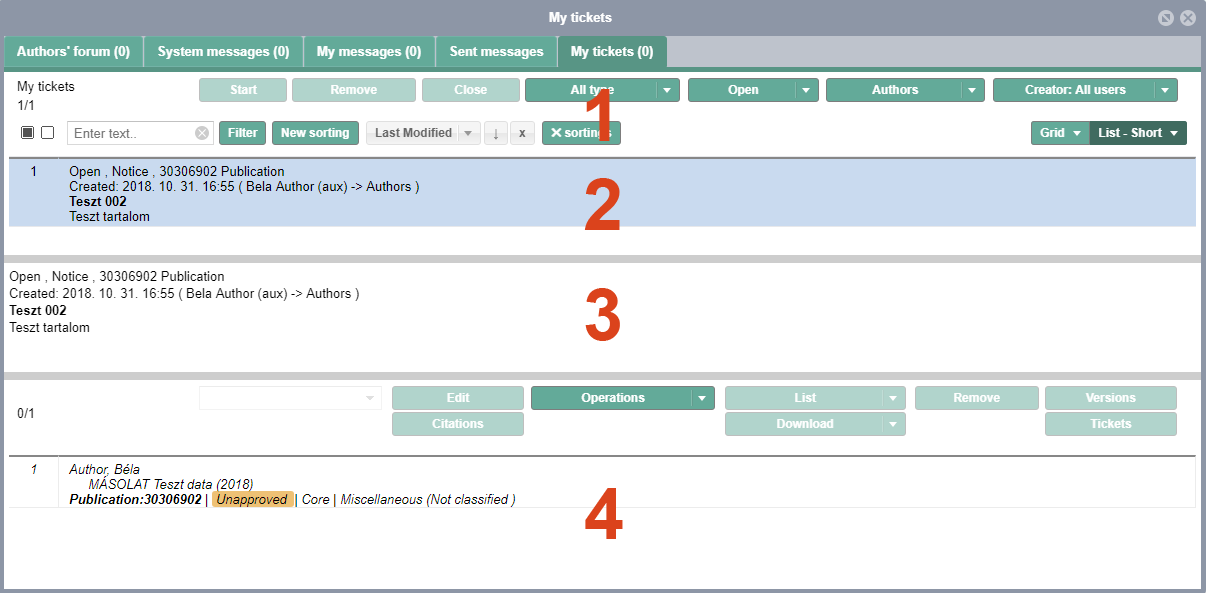
Tickets indicate tasks, data to be checked or problems related to certain records. They can be created either
automatically or manually as a result of a change to the records.
Tickets can be viewed in two ways: you can list the tickets relevant to You,
or you can view all tickets related to the selected record.
To create a new ticket first select the required record in the Content view, then click the
Tickets button in the Upper menu bar.
Click the New button in the window coming up, then give the data needed.